A Sweet and Easy Treat to Make at Home
Imagine this: It’s a lazy Sunday afternoon, and you’re in the mood for something sweet. You don’t want to bake a whole cake, but you want something delicious that satisfies your chocolate cravings. Enter the Butterfinger Balls Recipe—a dessert that is simple to make, irresistibly delicious, and perfect for any occasion. Whether you’re a seasoned baker or just someone who wants to whip up something quick, Butterfinger Balls are the answer. They combine the crunch of the famous Butterfinger candy bar with the creamy texture of peanut butter and a smooth chocolate coating.
The best part? You don’t have to spend hours in the kitchen. No baking required! Just a few basic ingredients, and you’re on your way to making a treat that’s so easy, it might just become your go-to recipe for satisfying a sweet tooth.
What Are Butterfinger Balls? A Brief Overview
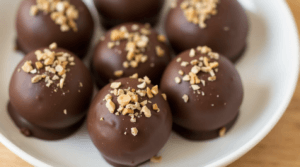
If you’ve ever had a Butterfinger candy bar, you already know the signature crispy, peanut-buttery crunch. Now, imagine turning that candy into a bite-sized ball of pure joy. Butterfinger Balls are essentially the candy bar in ball form, but with the added bonus of being homemade. These treats are made from crushed Butterfinger bars mixed with peanut butter, powdered sugar, and sometimes a little vanilla. Once formed into balls, they’re dipped in chocolate for that extra layer of decadence.
The Origin of Butterfinger Balls
You might be wondering, who first thought to make Butterfinger Balls Recipe? Well, it’s tough to say who exactly created them, but the recipe has been a popular homemade treat for years, especially around the holidays. They’re often a favorite for parties, potlucks, and family gatherings. It’s one of those recipes that’s passed down in families, shared on recipe blogs, and adored by people of all ages.
Key Ingredients That Make Butterfinger Balls Irresistible
What makes Butterfinger Balls Rcipe so tasty? It’s the combination of three ingredients that create the ultimate flavor balance:
- Butterfinger Bars: These bring the crunchy, sweet, peanut-buttery goodness.
- Peanut Butter: It adds a creamy richness that blends perfectly with the crunch of the Butterfingers.
- Chocolate Coating: This gives the balls that signature candy-bar feel and elevates the texture.
These simple ingredients come together in a magical way, offering both texture and taste in every bite!
Ingredients You’ll Need to Make Butterfinger Balls
Ready to make your own batch of Butterfinger Balls Recipe? Here’s a list of the ingredients you’ll need. The best part? You probably already have most of them at home!
| Ingredient | Quantity |
|---|---|
| Butterfinger Bars | 8 full-sized bars |
| Peanut Butter | 1 cup (smooth or chunky) |
| Powdered Sugar | 2 cups |
| Vanilla Extract | 1 tsp |
| Semi-Sweet Chocolate Chips | 1.5 cups |
| Optional: Sprinkles or Sea Salt | For garnish |
The Essential Ingredients for the Perfect Butterfinger Balls
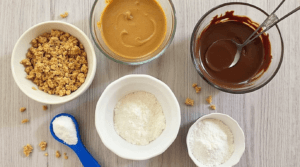
- Butterfinger Bars: These are the star of the show! Crush them up into small pieces, so they blend nicely with the peanut butter and sugar.
- Peanut Butter: Make sure to use creamy peanut butter for smooth texture. Crunchy peanut butter works, but creamy is usually preferred for these balls.
- Powdered Sugar: This helps bind everything together and gives the balls their sweetness.
- Vanilla Extract: Adds a subtle depth of flavor that enhances the sweetness.
- Chocolate Chips: Choose good quality chocolate, as it’ll make the coating extra smooth.
Optional Add-ins for Extra Flavor and Texture
While the basic recipe is perfect on its own, you can mix it up with a few additions:
- Crispy Rice Cereal: Add some crunch to the inside of the ball.
- Toffee Bits: For an extra layer of caramel flavor.
- Peanut Butter Chips: If you love peanut butter, these add a nice extra kick.
Step-by-Step Guide to Making Butterfinger Balls at Home
Now that we have the ingredients, let’s dive into the fun part: making the Butterfinger Balls! Follow these simple steps, and you’ll be on your way to a sweet treat in no time.
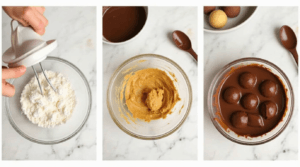
Step 1: Prepare the Butterfinger Filling
First, take your Butterfinger Bars and crush them into small pieces. You can do this by placing the bars in a plastic bag and gently pounding them with a rolling pin or mallet. The goal is to break them down into small crumbs, not a fine powder.
In a large mixing bowl, combine the crushed Butterfinger pieces with peanut butter, powdered sugar, and a little vanilla extract. Stir it all together until the mixture is fully combined. You’ll end up with a thick, dough-like consistency.
Tip: If the mixture feels too sticky or too dry, add more powdered sugar or peanut butter until you get the right consistency for rolling.
Step 2: Form the Butterfinger Balls
Now comes the fun part—shaping the filling into balls! Use your hands to take small portions of the mixture and roll them into balls about 1 inch in diameter. They don’t have to be perfectly round, but try to make them as even as possible for a uniform look.
Place the balls on a baking sheet lined with parchment paper, leaving a bit of space between each ball. Once you’ve rolled all the balls, pop them into the fridge for about 20-30 minutes to firm up. This helps the balls hold their shape when you dip them in chocolate later.
Step 3: Coat the Balls in Chocolate
While your balls are chilling, it’s time to melt the chocolate! Use a microwave-safe bowl and heat your semi-sweet chocolate chips in short bursts (about 20-30 seconds), stirring in between, until the chocolate is smooth and completely melted.
Carefully dip each chilled Butterfinger ball into the melted chocolate, using a fork to lift it out and shake off the excess chocolate. Place each ball back on the parchment-lined baking sheet. You can dip the balls completely, or just coat them halfway, depending on your preference.
Tip: If you want an extra touch, sprinkle some sea salt or festive sprinkles on top of the chocolate coating before it sets. This will add a unique flavor and texture.
Step 4: Refrigerate and Serve – Final Touches
After all the balls are coated, place them back in the fridge to allow the chocolate coating to fully set. This typically takes about 30-60 minutes, depending on the thickness of the chocolate coating.
Once the chocolate is firm, your Butterfinger Balls are ready to serve! These little bites of heaven are perfect for sharing at parties, gifting to friends, or just enjoying as a personal treat after a long day.
Common Mistakes to Avoid When Making Butterfinger Balls
Making Butterfinger Balls seems simple, but there are a few mistakes that can ruin the texture or flavor. Here are some common pitfalls and how to avoid them:
Overmixing the Filling – Why It Matters
If you overmix the Butterfinger and peanut butter mixture, you could end up with a tough, dry texture. Mix until everything is combined, but avoid beating it for too long.
Choosing the Right Chocolate for Coating
Not all chocolate is created equal. The chocolate you use to coat your Butterfinger Balls should melt smoothly and harden well. Choose high-quality semi-sweet or milk chocolate chips for the best results. Avoid using chocolate chips meant for baking (like unsweetened chocolate), as they can be too bitter.
Incorrect Consistency – How to Fix It
If your Butterfinger Balls are too dry, the mixture might not stick together properly. Just add a little more peanut butter or powdered sugar. If it’s too sticky, add more powdered sugar until the dough holds its shape when rolled.
Variations on the Classic Butterfinger Balls Recipe
One of the best things about the Butterfinger Balls recipe is that it’s versatile! You can tweak it to match your tastes or dietary needs. Here are a few ideas for making different versions:
Peanut Butter and Butterfinger Balls: A Creamy Twist
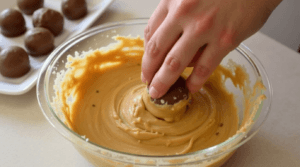
If you love peanut butter, why not add even more of it to the mix? Try adding an extra half cup of creamy peanut butter to the dough for a richer, creamier texture. These peanut butter-infused Butterfinger Balls are sure to satisfy your craving.
No-Bake Butterfinger Balls – Quick and Easy Version
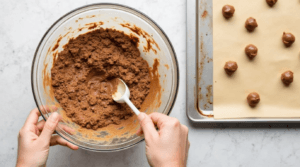
Want an even quicker version? Skip the chocolate coating and refrigerate the mixture until it’s firm. You’ll still get that great crunch and peanut butter flavor without the extra step.
Vegan Butterfinger Balls – A Dairy-Free Option
For a dairy-free or vegan twist, you can easily make Butterfinger Balls without using milk chocolate. Opt for dark chocolate or use a dairy-free chocolate coating. Check the labels on your peanut butter to make sure it’s vegan-friendly, and you’re good to go!
Troubleshooting Your Butterfinger Balls Recipe: Problems & Solutions
What happens if your Butterfinger Balls Recipe don’t turn out as expected? Don’t worry—here
Problem 1: The Balls Are Too Soft and Fall Apart
If your Butterfinger Balls are too soft and fall apart when you try to roll them or coat them in chocolate, it usually means the filling mixture is too wet. Here’s how to fix it:
Solution: Add a little more powdered sugar to the mixture. This will help bind the ingredients together and firm up the texture. If you’ve already rolled them into balls, you can place them in the fridge for a little longer to firm them up before dipping them in chocolate.
Problem 2: The Chocolate Coating Isn’t Setting Properly
It’s a common issue—sometimes the chocolate coating doesn’t set and remains soft or sticky. Here’s what might be happening:
Solution: Make sure your chocolate is melted properly and that it’s not too thin. If it is, add a small amount of coconut oil or vegetable shortening to help the chocolate harden faster. Also, ensure the Butterfinger Balls are cold before dipping them to help the chocolate set more easily. The balls should be chilled in the fridge for at least 30 minutes before dipping.
Problem 3: The Balls Are Too Sweet
If you find that your Butterfinger Balls are too sweet for your taste, it could be due to the amount of powdered sugar in the mixture. Remember, Butterfinger Bars themselves are already quite sweet.
Solution: You can adjust the sweetness by reducing the amount of powdered sugar in the filling mixture or using unsweetened peanut butter. If you love the flavor but want less sugar, you could also try making a slightly smaller batch of the filling and balance out the sweetness with a little more crushed Butterfinger.
FAQs About Butterfinger Balls
Q1: Can I use any type of chocolate for the coating?
Yes, you can! While semi-sweet or milk chocolate are the most common choices, you can also use dark chocolate for a richer, less sweet flavor. If you prefer a dairy-free option, you can use dairy-free chocolate chips or even a vegan chocolate coating.
Q2: Can I make Butterfinger Balls ahead of time?
Absolutely! You can make Butterfinger Balls a few days in advance. Just store them in an airtight container in the refrigerator to keep them fresh. They should last for about 1-2 weeks.
Q3: Can I freeze Butterfinger Balls for later?
Yes, you can freeze them! To freeze, place the balls on a baking sheet in a single layer, and freeze them for about an hour. Once frozen, transfer them to an airtight container or freezer bag. You can keep them in the freezer for up to 3 months. Just let them thaw for about 10-15 minutes before serving.
Q4: Can I make Butterfinger Balls without peanut butter?
You can try making them with alternatives to peanut butter, like sunflower seed butter or almond butter, especially if you have allergies. Keep in mind that the flavor will change slightly, but they will still be delicious.
Q5: How do I know when the chocolate coating is properly set?
The chocolate will set when it becomes firm and matte. It should not feel sticky when touched. If it’s still soft, pop the balls back in the fridge for another 10-15 minutes until the chocolate is fully hardened.
How to Serve Butterfinger Balls: Perfect Pairings and Presentation
Now that your Butterfinger Balls are made, you might be wondering how to serve them! These little treats are not only delicious, but they’re also perfect for impressing guests or treating yourself. Here are a few fun ideas for serving and pairing them:
1. Perfect for Parties and Gatherings
Since Butterfinger Balls are easy to make in large batches, they’re ideal for parties and holiday get-togethers. Arrange them on a cute platter or in small cupcake liners for an extra touch of elegance. You can also serve them alongside other homemade desserts like brownies or cookies for a sweet spread.
2. Pairing with a Drink
These treats are sweet enough to enjoy on their own, but if you’re looking for a drink pairing, try a cold glass of milk or a rich coffee. The chocolate and peanut butter flavors go really well with the bitterness of coffee or the richness of milk. For a grown-up treat, you could even pair them with a nice dessert wine or a glass of sweet iced tea.
3. Gift-Worthy Treats
Wrap your Butterfinger Balls up in a cute box or mason jar for an adorable homemade gift. They make great gifts for birthdays, holidays, or as a sweet “just because” treat. You can even decorate the jar with festive ribbons or stickers for that personal touch.
4. Fun for Kids – Let Them Help!
One of the best things about Butterfinger Balls is that they’re easy enough for kids to help with. From crushing the Butterfinger Bars to rolling the mixture into balls, little hands will love getting involved in the kitchen. Plus, they can help decorate the chocolate-coated balls with colorful sprinkles or sea salt for a personalized touch.
Conclusion: Why You Should Make Butterfinger Balls Today
In conclusion, Butterfinger Balls are the ultimate sweet treat—simple to make, customizable, and oh-so-delicious! Whether you’re making them for a party, as a gift, or just because you’ve got a craving for something sweet, these homemade treats will never disappoint. With just a few simple ingredients, you can create something that’s both satisfying and fun to make. So go ahead, roll up your sleeves, and treat yourself to a batch of Butterfinger Balls today! Trust me, once you take that first bite, you’ll be hooked.

